At the latest HMGS-PSW October Surprise historical miniatures convention, I featured my recently posted French republican Battle of Montenotte April 1796 scenario and utilized some of my recently painted 1790’s period Austrian army. The game was fast paced and close with the winners determined on the final turn. WR couldn’t have play balanced the scenario any better considering the difficult situation the Austrians find themselves.
Earlier this month I posted the Montenotte scenario notes, terrain and set up information: Montenotte 1796 scenario. Included in the Montenotte scenario write-up is a mini-scenario for Monte Negino. At the end of this after action report (AAR) there is a slide show of the all the game photographs.
Opening scene Turn 0700 (1): With the mountainous fog swirling around the cold soldiers, the morning starts with the French republican army posed to launch their attacks on the Austrian positions. Yesterday, these same Austrians spent the late afternoon assaulting the French defenders on Monte Negino (see mini-scenario in Montenotte notes above). During the rainy night, General Bonaparte ordered French reinforcement to arrive at Monte Negino (GD La Harpe). General Bonaparte also ordered GD Massena with GD Meynier’s division to Altare, then march against the exposed Austrian right flank at Montenotte Superiore during the early morning. As the Austrians prepared to renew the assault on Monte Negino, they spied the French reinforcements and cannon. Wisely they called off their morning assault and repositioned themselves to receive the French reinforced attack from Monte Negino and covered the Altare road with a weak detachment.
The weather is foggy with 12″ visibility till 0800, cold and damp. Light patchy snow on ground but has no tabletop effect. Movement on the mountain ridge flat ground is normal but movement on the higher peaks is reduced for close order formations. Light woods (textured felt under trees) and lower medium wooded steep slopes degrade close order movement. Austrians stayed to the clear ground while the French, with their open order formation capability, passed quickly the terrain (open order formations normally have no movement reduction). Details found in scenario notes and tabletop map legend.

Opening French division La Harpe on Monte Negino looking northward. Movement off the actual ridge level is difficult for close order formations. Morning starts with fog till 8am turn (12″ visibility).
Austrian starting dispositions on the road from Savona had FML Sebottendorf (played by Greg) deploying his three Hungarian fusilier battalions (IR 19 Alvintzi and IR 52 Erzherzog Anton) and the Freiwilliger grenz to cover Monte Pra and Monte San Giorgio. The sole Austrian position battery (3 cannon) was positioned near Monte San Giorgio and the Austrian commander in charge, FML Argenteau rode up Monte San Giorgio to see the French early movements. Sending FML Sebottendorf with Defend orders, his attention soon was drawn to the arrival of GD Massena and GD Meynier on the Altare road covered by GM Rukavina’s units.
GM Rukavina’s command (Fred) consisted of 1 1/2 battalions on Bric Porassine (IR 49 Pellrigini and half battalion IR 50 Stain) plus, deployed on the Altare road, IR 16 Terzi and the other half of battalion Stain. A small detachment of Gyulai freikorps skirmished before battalion Terzi. GM Rukavina also had Defend orders.
Other than their skirmishers, Austrians are held in place for their turn one movement phase per scenario notes. Austrian plans were to delay the French from moving too fast up the road from monte Negino and try to hold a defensive line near Montenotte Superiore from GD Massena’s attack. They used the event card early to summon IR 24 Preiss on the first available turn to assist with the defensive positions at Cascina Garbazzo.
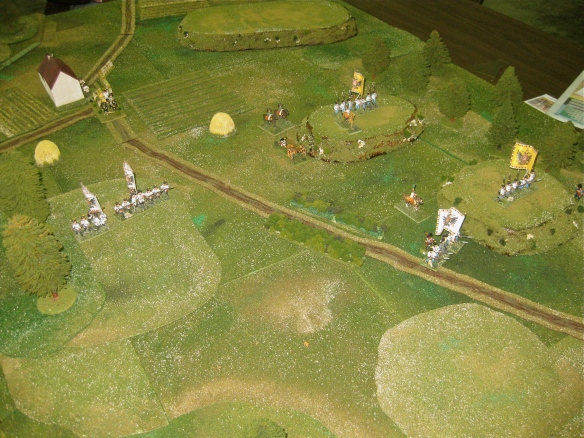
The Austrian positions on Bric Porassine (L) and Monte Pra (R) and Monte San Giorgio (center). The French under GB La Harpe are off picture at right towards Monte Negino.
Turn 0700 (1st) continued: French awoke from their last night marching and shook off the morning cold. GD La Harpe (Doug and Dave) wasted no time and quickly marched columns and open order skirmisher screens forward to engage the Austrians on Monte Pra. On the Altare road, GD Massena and GD Meynier (played by Daniel, WR’s son and victor of the Voltri scenario recently) marched onto the tabletop with columns and skirmishers. French were moving fast since the scenario was 10 turns in length and they had a tabletop distance to travel. Both French divisions had Attack orders. French planning seemed to rush forward and destroy the Austrian front line battalions, then seize Montenotte Superiore before clearing the northern edge of the tabletop.

Opening French movements. GB La Harpe advances at left and GB Meynier arrives on western road, from Altare, with GD Massena (at top).
At the end of the first turn (0700), the sounds of light musketry was carried on the still foggy morning airs.

First contact. French skirmishers encounter the weak companies of Freiwilliger grenz and Austrian outposts near Monte Pra.
Turn 0720 (2): The French move forward on the Altare road towards Montenotte Superiore. French skirmishers engage the deployed Austrians screen of Gyulai freikorps with some battalion Terzi fusiliers in support as “improvised skirmishers”*. On the path to Cascina Garbazzo, a column of converged carabiniers and the 4th DB Legere march.
* Improvised skirmisher rule is covered in the scenario notes. The other types of open order formations (semi, full, extreme, 3rd germanic rank etc.) are covered in the napoleonic rules, files and video section found on the WR main page (link below).

Same on Altare road. French advance skirmishers engage their Austrian opposites as a French infantry column marches toward Cascina Garbazzo lower left.
On the road from Monte Negino, the French un-jam themselves at the narrow mountainous ridge road near the redoubt. Their leading units are skirmishing with the Austrian Freiwilliger grenz near Monte Pra.

French view from Monte Negino as the fog slowly lifts. French columns and open order skirmishers are streaming northward under GB La Harpe.
On the Austrian 2nd half of 0720 turn, they promptly about-faced and march towards Montenotte Superiore. Lucky their skirmisher screen wasn’t within 2″ (minimum fire zone for muskets) so they received no opportunity* or withdraw fire from the French skirmishers when they turned about to retire.
* Whenever an enemy unit does a formation or facing change within 2″ of the frontal arc of an enemy unit, that enemy unit fires a double penalty if within minimum fire range (2″ for muskets). The game features a strong; before you perform an action on the enemy, the enemy has a chance to react…sometimes by giving opportunity firepower…. before your attempted action is performed aspect. The game’s sequence of play (SOP) bears this out quickly and is the heart of the game’s mechanics. New players find the SOP is different from the typical I Go /You Go game systems of many napoleonic rules.
Turn 0740 (3): The French keep coming. General view of the action from a northeastern seagull view. No seagull drone jokes please…

General table view of the opening action from northeast. Players Doug (l to r), Dave and Daniel are commanding the French commands.
After the French 0740 3rd turn movements, the Austrian Freiwilliger grenz has been pushed back by sheer odds and the forward IR 52 Erzherzog Anton battalion on Monte Pra figures it is time to retire. The Austrian fusilier battalions form toward the space between Monte Pra and Monte San Giorgio. FML Sebottendorf just sees a sea of republican Frenchmen heading for his three Hungarian fusilier battalions. The only good Austrian point so far is a random musket ball severely wounded GD La Harpe as he directed his leading units. His replacement will be promoted in two turns.

French republican infantry swarm forward as Hungarian battalions retire toward Montenotte Superiore. French GB La Harpe was seriously wounded leading his skirmishers.
On the Altare road GD Massena and GD Meynier march forward. Their detached column of carabiniers and 4th DB Legere fall just short of reaching Cascina Garbazzo before the arriving IR 24 Preiss battalion.

French under GB Meynier and GD Massena push forward on Altare road and a column almost reaches Cascina Garbazzo at left. Austrian battalions prepare a defensive line to hold the approaching French advance.
Turn 0800 (4): The fog lifts from the mountainous ground. Close action musketry combat occurs across the battlefield. On the Monte Negino road the Austrians have turned about and steel themselves to meet head on the French masses. Time to slow up this steamroller of Frenchmen thinks FML Sebottendorf as musket balls sing past his ears.

The three Hungarian battalions attempt to stem the French advance near Monte Pra and Monte San Giorgio with a small positional battery in support.
Altare road shows the French skirmishers attempting to out flank the deployed Austrian linear line. At Cascina Garbazzo, the French column, led by the carabinier converged battalion, assault the building defended by the IR 24 Preiss battalion.

Altare road shows a stiffing Austrian line forming to await the French advance. French arrive at Cascina Garbazzo at top.
Seagull flying over the Cascina Garbazzo action…..

Austrian IR 24 Preiss arrives in time to occupy Cascina Garbazzo before the French. French assault, losing one carabinier miniature to firing, and fail their rolled morale.
After the Austrian movement phase, the shock or assault phase is conducted. This shock phase* is the French shock phase so the assault on Cascina Garbazzo is performed. Passing morale check to receive, the IR 24 Preiss battalion fire a wicked volley into the onrushing French carabiniers who crumble to the ground.
* Shock combat example: Losing a miniature causes a morale check… roll 10D, needs adjusted 7 or lower to pass (base 8 less one for miniature lost). Daniel rolls a 9… two over so morale disorder on the carabiniers. Since the attacking force didn’t rout away from pure firepower now calculate the shock combat odds and difference in CMR (Combat Morale Rating) with terrain and morale adjustments. Odds are 4 Austrian fusiliers in building (capacity limit) vs. up to six ranks of French miniatures in their column formation….12 miniatures or 12/4 = 300% basic odds. Building has limitation of 200% (only so many doors and windows) so reduced to 200% odds. The CMR calculated differential value is; Preiss battalion base CMR is 6, plus 2 for defending in a class II building for calculated 8 value. French leading battalion, the carabiniers have a basic 8 CMR, less one for lost miniature, -2 for morale disordered status and plus 1 for elite formation over line rated unit. Adjusted French value is 6. Compare the Austrian to French adjusted values gives minus 2 column (attacker’s value less defender’s value) on the shock combat table cross-indexed with the 200% odds. There are six outcomes on each odds line. 6D is rolled and Daniel rolled a 2 which means the attacking force is DR (morale disordered and forced to retire 10″ for infantry). Since the carabiniers were already morale disordered the result is upgraded to a routing result. The carabiniers rout back. The 4th DB legere battalion behind the carabiniers added their strength to the assault odds so they were morale disordered by the assault retirement. Since a friendly unit broke (routed) within 2″, they are required to pass another morale check. True to form, Daniel rolled above the base CMR of 7 for the 4th DB Legere and they routed back with the carabiniers. Example of shock combat chart detailed above NAPCOMB4 June2011

Austrians just win the assault combat roll, the elite carabiniers rout away taking the 4th Legere battalion with them. Austrian success! GD Massena moves forward at left.
Turn 0820 (5): Hard pressed Hungarian infantry battle to hold the advancing French republican infantry before Monte San Giorgio. The French attempt to flank the Hungarian fusiliers while pinned their attention to the front with French skirmishers. The Austrian positional artillery battery (3 cannon) fires upon the flanking French battalion column as the remaining Freiwilliger grenz valiantly screen the far left flank on Monte San Giorgio. Other French republican infantry and the small dragoon squadron march around and over Bric Porassine in distance.

Hungarian infantry besides Monte San Giorgio are hard pressed to slow the relentless French advance. Outnumbered, their defense is slowly crumbling… then they are flanked!
On the Altare road the French form up and columns advance to engage the Austrian battle line. Both commanders join their soldiers to rally to the colours. Austrian regimental artillery* rake the advancing French republican infantry.
* We represent regimental artillery by increasing the battalion’s firepower by 20% factor and mark its tabletop presence by attaching artillery crew miniature to the battalion. Firepower tables use a percentage system for results. From the photograph below, the Austrian fusilier battalion on road has 6 miniatures firing for a base 64% (class B firing grade, 3 rank formation, within 1″ or minimum range from small arms firing chart). the regimental artillery adds 20% to base firing percentage of 64% or 64%+20%=84% base firing percentage. Assuming no terrain or other firepower modifiers to the calculated %, any roll on percentage dice of 84 or lower causes a French miniature loss. If the French battalion losses a miniature from Austrian firepower, they need to pass a morale check adjusted for the miniature loss (base CMR of 6 less one for miniature loss means 5 or lower needed on 10D morale roll). Nearby commanders typically add one to the battalion’s base CMR level if with 9″ command radius. Firepower charts NAPCOMB2 June2011 (small arms and firepower modifiers) and NAPCOMB1 June2011 (artillery) for review if interested.
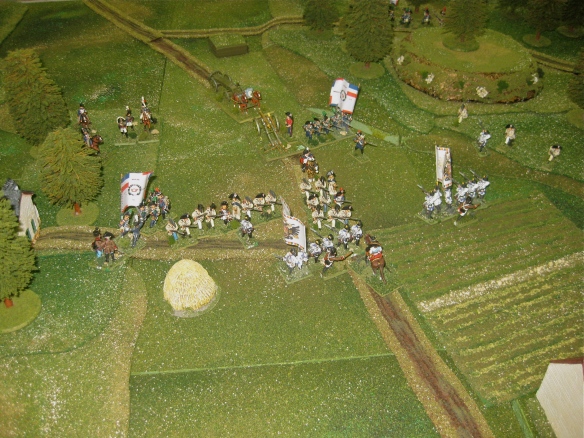
French assaults on the Austrian defenders on Altare road. Both sides place their commander into the fight, leading their men.
Turn 0840 (6): The French break the Austrian defense near Monte San Giorgio and continue their forward momentum towards Montenotte Superiore. FML Sebottendorf tries to rally his broken battalions and is greeted with a French skirmisher’s musket ball wound for his efforts. Sebottendorf’s command battle losses cause morale to drop further (over 20% loss = -1 CMR)*. Austrian battery limbers up to quickly retire amidst the retiring Hungarian fusilier battalions.
* Cumulative command miniature losses eventually cause morale CMR loss at 20%, 40% and 60% loss levels. Example: If the command had 25 miniatures at battle start, when the command has 5 miniature losses, the entire command (units) have their CMR adjusted by -1. At 40% loss level (10 miniatures), -2 CMR adjustment. At 60% loss = -3 CMR adjust. As you can reason, command with heavy losses tend to break or suffer morale disorder quicker due to the cumulative miniature losses in the command. Each command has their own calculated 20/40/60 levels. Loss % levels are tabletop marked by a coin styled marker placed near the command’s commander.
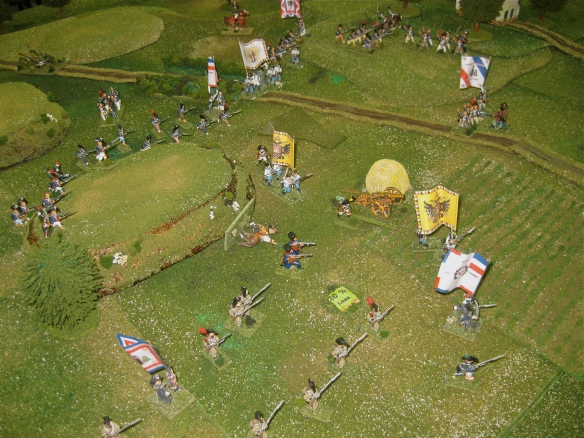
With their commander (Sebottendorf) wounded, the Hungarian defense collapses. French open order formation infantry race northward to Montenotte Superiore.
Turn 0900 (7): Time to present the reader with an updated general view of the battle. FML Sebottendorf’s weak brigade is totally shattered (60% loss after a good delaying defense) and Austrian defense along the Monte Negino road is patchwork at best. GM Rukavina’s command is retiring on Montenotte Superiore for the moment while looking over their right shoulders. GM Rukavina’s horse was shot dead rolling the commander to the ground*. GD La Harpe’s open order infantry formations are swinging towards Montenotte Superiore after crossing Monte San Giorgio or Bric Porassine. GD Massena and GD Meynier command won their fight on the Altare road. Now they are advancing directly on Montenotte Superiore chasing the retiring Austrian battalions.
* Commanders when hit by a random shot roll 6D: 1-3 horse hit, commander out of action till next command phase (command phase occur twice every turn). 4-6 commander is hit and wound severity determined. Wounds can be “light” (2 turn out of action), “Severe” (out of game or longer if campaign) or “mortal”. A percentage table determines the results. promoted replacement commanders arrive on the second turn after loss.

Overall eastern view of the chaotic fighting near Montenotte Superiore. Reduced Austrian battalions are fighting in a sea of Frenchmen.
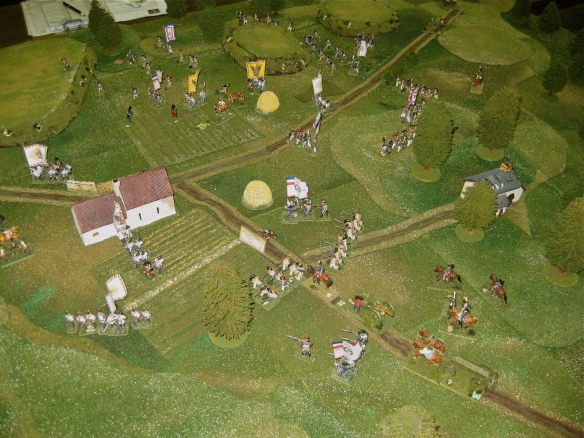
Another general view from the western front looking back towards Monte Negino. French open order formations are everywhere.
So, why the ammo train on the tabletop WR? I use ammo trains* to reflect a location or distance for infantry small arms supply source or actual artillery battery ammunition reload supply.
* In this scenario, the ammo train miniature just represented a source or radius (4′) to maintain small arms ammunition since the heavy last night rains prevented the artillery trains to arrive on the battlefield. If the firing infantry battalion is beyond 4 foot radius of the ammunition train, the unit rolls (1 on 6D) for possible low ammo status (firepower reduced by 75% modifier) whenever a close order formation fires.
Turn 0920 (8): General French advance on all fronts. The trapped Hungarian fusiliers attempt to turn about and fight their way out of the French skirmisher screens. Too late, the small French dragoon squadron charged down from Bric Porassine and impacted the Hungarian infantry. This is too much for the poor Hungarians who completely rout past the startled French skirmishers. Quickly, after finding another horse, GM Rukavina places an Austrian fusilier battalion into Montenotte Superiore before the French arrive next turn. With FML Argenteau assistance, they both try to rally the remains of the Austrian army near Montenotte Superiore.

Desperate Hungarians attempt to push aside the French skirmishers as they are charged by the lone French dragoon sqn. Hungarians rout.

When the Hungarian rout, the positional artillery is soon taken. Other Austrian battalions seek to organize a haphazard defense at Montenotte Superiore.
Turn 0940 (9): With this turn and one more, the scenario is quickly drawing to a close. The French need to seize Montenotte Superiore and prevent any Austrian battalions from positioning themselves , in good morale order, near the northern tabletop edge (see victory conditions). Promptly, GD Massena orders in French columnar assaults on Montenotte Superiore village. The hasty Austrian defenders fire volleys into the massed French ranks causing losses, but the French republicans keep coming forward. The final close building combat is going to be bloody… as both sides are exceeding their first stage 20% loss levels. Morale is touchy and failed morale checks can cause compounding effects….
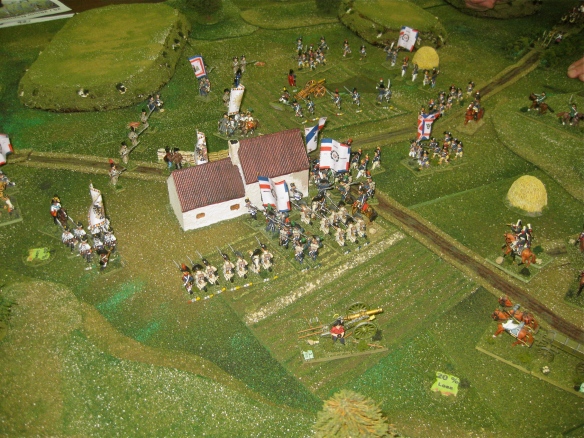
Just as the defense is formed, the French infantry form columns and assault the Montenotte Superiore village.
As Montenotte Superiore is stormed by the French infantry, a smaller but deadly action is rejoined at Cascina Carbazzo. The same carabiniers and 4th DB Legere have rallied and again attempt to take the building from the defenders of IR 24 Preiss.
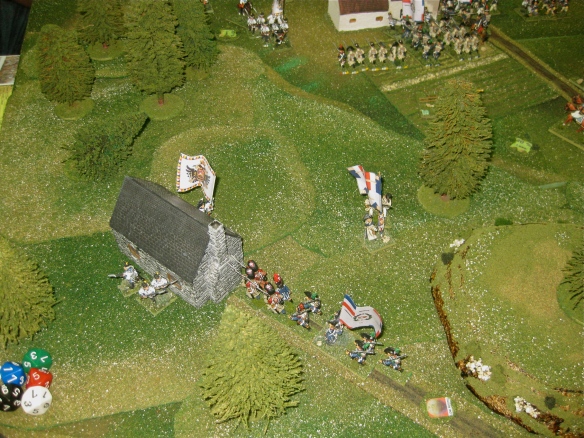
Meanwhile, the side battle at Cascina Gabrazzo with the reformed French carabiniers and 4th Legere btn. assault.
Austrians finish their movement phase. Next turn phase is the French shock phase with four battalion columns* assaulting Montenotte Superiore. The brave Austrian IR 16 Terzi battalion occupy the forward building while the reminder of Gyulai freicorps have the rear building. This is it…. so the Austrian player plays his special event card* (heroic Austrian battalion) which adds +2 to the unit’s CMR. First French assault crumples to musket volleys and fled the area. French shake off the resulting required morale checks as their leadership brings the next columnar assault. Battalion Terzi fires again*, more Frenchmen drop, French carry forward over their casualties to crash the doorways. Butts and bayonets, the Austrians fusilier don’t give ground and repeal the Frenchmen who retire morale disordered. Thrid assault, the French 17th DB Legere hit the walls after Austrian volleys finally miss the massed column target for effect. With bayonets and musket butts, the French legere wrestle control of the front Montenotte building. The defending Terzi battalion, morale disordered, retire towards the northern table edge….still defaint in spirit.
* Each column assault is treated as a separate event. Players cannot combine all four columns into one shock assault calculation. We view the four columns as arriving at different times during the 20 minute turn…so no grand correlation of assaulting. Each time the defender volleys during the same shock combat phase, the firepower is reduced by 1/3 after the first firing… so on the third volley the firepower is reduced by 1/3 then again by another 1/3. Example: Base is 25% doubled for final shock phase firing = 50%. On the third firing the calculation would be 50% x .667 x.667 or 23% rounded up to next full percentage of any faction.
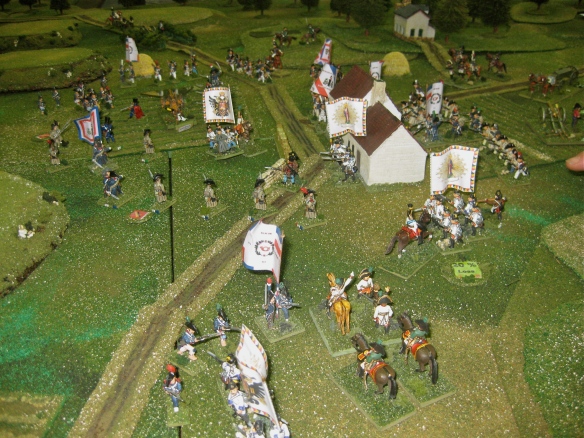
Austrian view for the chaos around Montenotte Superiore. French skirmishers are firing upon the Austrian HQ staff base and retiring Austrian fusiliers.
Scene after the final successful French legere assault as the reformed Austrian IR 48 Pellrigini battalion, with GM Rukavina, holds near Montenotte Superiore.

Austrian defender beat off the first French assaults. The heroic event card was played to improve Austrian morale at Montenotte Superiore.
Turn 1000 (10): Final turn. Austrians complete their Rally phase. French move and form column to assault the remaining defenders of Montenotte Superiore (Gyulai freikorps). They must clear the entire village before scenario end and prevent two or more Austrian battalions from remaining in good order along the northern tabletop edge (see victory conditions for details). French battalions fan out to engage the reformed Austrian battalions with musketry.

Alas, renewed French assaults cleared the remaining Montenotte Superiore buildings. Our heroic Austrian defenders retire as scenario ends.
The Austrian movement phase completed, the French assault quickly evict the freikorps defenders so the village is taken on the last shock phase. But the Austrians still had three Austrian fusilier battalions who rallied from the last turn, including the brave battalion Terzi. Even with the French musketry causing losses (and morale checks), the battle stained Austrian fusiliers held on several morale rolls at scenario end. Game ended with Austrian and French receiving the Draw victory rating because of the Austrians standing defiant on the northern table edge with two battalions.
Note the French battalions with “low ammo markers” in last photograph. For the scenario, the French players had to assign (their choice) three French battalions with these “low ammo” coin markers. These markers represented the battalions which had either poor quality or limited musket armed infantry. This is the Army of Italy….those ragged, forgotten, ill-equipped Frenchmen who General Bonaparte led to his early victories. After this battle, those three battalions are armed with Austrian muskets for the next battle at Dego.
Great scenario game for all. Fred and Greg pulled a Draw victory result which bettered the actual French historical result. Both Daniel, Dave and Doug (the three D’s) played a strong active French advance, just running short on the last turn to morale disorder the Austrian fusiliers. A close game, could have been a French minor victory on a single morale check roll.
Since the game finished fast and on time (3 hours), several of the players elected to swap sides and return to Montenotte April 1796 for a second game at the convention. The results were similar but this time a French minor victory was achieved. A picture and short comments AAR for the second game can be found on the HMGSPSW.org site.
Interested parties can check out the library of our napoleonic game rules, files, videos etc at: Napoleonic rules group found on WR main page.
Next up in WR’s little series of April 1796 battles will be the battle of Dego (April 14th and 15th) with a mini-scenario for the Cosseria ruin castle action. One must give the opportunity for the Piedmontese grenadiers to shine before the rest of the Sardinian-Piedmontese army finds itself on the battlefield at Mondovi.
Cheers from the warren….carrots on hand.
WR


Great looking table, and another fascinating small action on Bonaparte’s road to fame in Italy. Very good stuff! (great maps, too, as usual, by the way)
Thanks Peter,
Two down, two to go. Dego and Mondovi. Stay tuned as I finish them up during November. Might try out the Monte Negino mini-scenario (in Montenotte scenario) in two weeks. If done, I will report.
What a great batrep, nice one!!!!!
Ray,
Thank you and glad to see you take the time to read my efforts. Still working the fine art of AAR (Batrep).
Another enjoyable AAR thanks!
David,
Thank you again for reading my blogging efforts. If you enjoyed Montenotte and Voltri then the next two (Dego and Mondovi) should be interesting.
By the time of Dego, the French army supply train was totally breaking down and Bonaparte raced time to win his opening campaign before the ragged army scattered to find food.
Makes for some interesting scenario situations on the tabletop. Michael as WR
Very nice batrep, your minis are great and the table was wonderful, specially the fields!
Phil,
Thank you for your support of WR. Slowly collecting or making the required terrain on table as time permits and need. I like to play different scenario formats and situations so the terrain needs direct my efforts. WR
What an excellent scenario. It seems to build from almost a skirmish into a great little battle. The Austrians had a tough job as you said; completely surrounded by French!
Loved the video of the stills at the end, a great way to view the photos in succession.
Thanks for the report,
James
James,
Thank you for comments and reading the Montenotte AAR.
Figuring out a way to have an uneven historical battle workable on the tabletop. That the secret to fun gaming in my eyes… even points games gives even results assuming even luck. Uneven forces with proper victory conditions makes both player sides figure out their successful tactics vs. the common player actions of line the miniature masses up and see who wins situation. I love the big battle with 250 miniatures per player (25,000 corps) but tend to enjoy the down to the fight with 4-5 battalions per player, a mistake can cost you dearly type game.
At Montenotte the Austrians couldn’t win if they tried…. took me several scenario tests to find the right victory levels. Voltri, the previous scenario, was similar but generally was more even in forces involved. Next is Dego….that scenario is a wild one due for November covering both days of battle.
The video slide show was an afterthought….glad to hear you enjoyed. I guess it will be standard for my AAR’s going forward since the material is already created in the WordPress.com media library files.
Don’t forget to place your email on file to be notified of my posts. I don’t post a lot (2-4) times a month. Otherwise, check back to the warren soon.
Michael aka WR
WR
No worries Michael, I already follow your blog, so am kept informed of updates that way. I look forward with anticipation to Dego and Mondovi. I’ll then be asking you to keep going with the rest of the battles of the campaign…!
I have put a link to this report and the one for Voltri on a ‘bicentennial blog’ that we have put together (http://waterloo2015.blogspot.com.au). There are pages with links to battles from the years before 1811 (since the blog only started in 2011). Hopefully it might alert some more people to your great games and scenarios (and all the other beaut stuff on your blog).
James
MIchael, I have nominated the Warren for the Leibster Blog Award. 🙂
Peter
Hi Peter,
Thank you for your nomination of the Wargamerabbit Warren.
Question. What is the Leibster? I have ruled out the Pultizer award for myself… my english skills are sorely lacking and graphic work needs improvement. But I will keep the long ears working.
Michael – Head rabbit
I will chime in if I may Peter/Michael. It is something that is well deserved. It bears no title, brings no prize money and means nothing outside the blogosphere, but carries all the prestige of recognition by one’s peers. It also comes with three, pleasurable obligations; see post on Peter’s blog (another deserving winner and one of my top five favourites): http://blundersonthedanube.blogspot.com.au/2012/11/tis-better-to-give-than-to-recieve.html
Great. Now I have a better understanding and project for the rainy weekend out here on the west coast. Thanks Peter and James.
Michael aka the Wargamerabbit (one word to twitch Google’s world)
Intriguing! The table doesn’t look a lot like the actual terrain, but I don’t suppose it could! Having walked over it all, I can only say that it is very taxing. Steep slopes everywhere. There are a few photos here:
http://historydata.com/places/montenotte.php
Best wishes, Martin Boycott-Brown.
MBB,
Glad you had a chance to see my work. Like you I have walked a few historical battlefields but Montenotte isn’t one of them (someday). I use the google terrain elevations for the basic overlay, scaled to our game rules, and with the need for miniatures to stand up… had to be subjective to the steeper battlefield sections. Your photos I did see as I wrote the scenario. Thank you for posting those terrain shots, and especially for the Monte Negino sub-scenario notes which I tried to reflect the steep hillsides along the path the the redoubt at Mt. Negino.
If you noticed, I have attempted to work up a series of the Italian 1796 1st phase battles fought by General Bonaparte’s army. Voltri, Montenotte, Cosseria, Dego (both days) and soon the Ste. Michelle-Mondovi battle group. Any errors are my own…. your comments are most welcome to correct errors. Your book gave me a solid base to work the situation at this early stage of the Italian campaign. Highly recommended for those who read this comment…and the scenarios in general.
Thank you for your efforts,
Michael aka WR
Additional note: Our games use a miniature ratio of 90 to 120 men per miniature and a ground scale of 1″ = 50yds.