
This past week the warren theater of operations changed from the Russian front to the cold December 1940 desert of western Egypt. The British, for background, have started Operation Compass, seeking to dislodge and repulse the Italian invasion of the Egyptian western desert region since September 1940. For weeks the Italians have remained stationary in their “fortified camps” after a short advance period, strung across the open desert, loosely linked by occasional patrols and rear support formations. Seeing this general inactivity, the British and Commonwealth forces under General Richard O’Connor started their local offensive to dislodge the Italians. First day operations went all too well, with the overrunning of several camps. WR’s Flames of War (FoW) scenario below is somewhat based upon an Italian fortified camp being assaulted by British and Commonwealth units, while giving the Italian a chance with the introduction of a localized Italian counterattack…. some Italian armor, such as it was in late 1940. The scene unfolds with the British and Commonwealth infantry and supporting armor deployed to assault the Italian lines. Matildas all gassed up, while Vickers light tank mkVIIb heard gunning their motors to race forward. For the allied infantry, Daniel’s choice was Indians or WR’s painted “Gurkhas” on the tabletop, painted years ago and never been used till last week. should note Gurkhas are a bit early for appearance in the desert war but basically Indian army in structure, so they will fit the platoon organization requirement to represent the Indian 4th Division. For the Italians, WR assumed the command. Positioned in their prepared wired and mined trench lines, the Italians were Posizione di Fucilieri infantry manning the trenches with a counterattack force of M11/39 and the “dune buggy” CV35 tankettes held in reserves. The possible showdown of CV35 vs. Vickers mkVIIb awaits it seems. Scenario starting position set up based upon “Hold the Line” scenario mission template and provides the victory objective conditions.
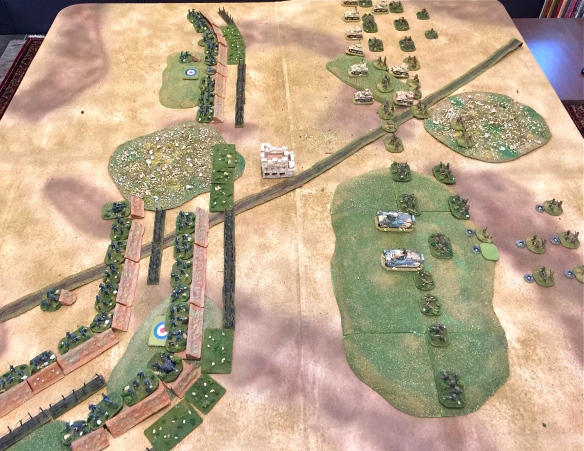
Opening scene on the desert. British and Commonwealth infantry at right. The Italians trench lines at left. Weather clear but cold for time of year, it is December 1940. British objectives placed.
The forces for each side in the upcoming tabletop scenario. For the British and Indians Daniel uses the British Rifle company list, found in FoW Hellfire and Back book, with special use exception granted for the Vickers light tank company [1800 points]:
Rifle Company HQ: CoCmd and 2iC teams. [25 pts.]
Three Indian rifle platoons: Each wit Cmd, 6x R/MG teams, ATR, lt. mortar team. [3x 175 pts.]
Mortar 3″ platoon: Cmd, Obs, four 3″ mortar teams. [110 pts.]
Royal Artillery troop: Cmd, Obs, Staff, four 25lb mostly off table except for observer. [395 pts.]
Matilda troop: Cmd. Matilda, and Matilda mkII. [475 pts.]
Vickers mkVII company: HQ platoon with Cmd mkVII, 2ic MkVII and one more mkVII. Then two armored platoons of Cmd MkII, two mkVII tanks. All total nine Vickers mkVIIb tanks organized in three platoons. [90 +180 or 270 pts.]
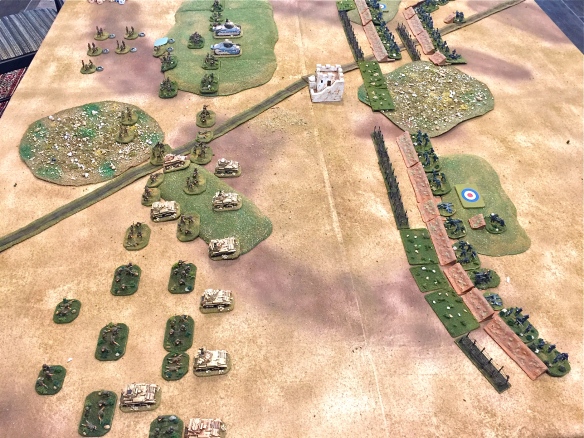
View from the opposite table edge. Allied on left, Italians on right. The Vickers mkVIIb gun their motors to race ahead, followed by the Indian infantry teams (three platoons worth).
For the Italians WR rostered the following units from the Hellfire and Back Posizione di Fucilieri list [1745 points]. Several platoons start as delayed reserves or ambush position and so marked below in list:
Italian HQ: CoCmd, 2iC teams. [25 pts.]
Three Fucilieri Posizione platoons: Cmd, six rifle/MG teams, 47/32 nest, HMG nest, trench lines, 2x barbwire and 1x mines. [3x 285 pts.]
Mortar platoon: Cmd, Obs., three mortar teams w/gun positions. [80 pts.]
Anti-Tank platoon: Cmd, four 37/45 A/T guns (as foil for Vickers mkVII company exception above). In ambush position at scenario start [120 pts.]
Demolisher platoon: Cmd, six Pioneer rifle teams, two lt. mortars. In delayed reserve status. [145 pts.]
Howitzer battery: Cmd, Obs., staff. four 100/17 cannon held as off table artillery w/gun positions. In delayed reserve status [205 pts.]
Medium Tank platoon: Cmd M11/39 and four M11/39 tanks. In delayed reserve status [215 pts.]
Tankette platoon: Cmd L3/35 with three L3/35 tankettes. In delayed reserve status [100 pts.]
Opening scene and Turn One: British / Indians have first movement. They advance at infantry pace all across their front line. The Vickers on the British right flank slowly roll forward, eager to close the range while firing their Vicker 0.5 MG. The RA battery 25pdr. troop drops smoke bombardment right on the Italian trenches, with the wind blowing the smoke cloud perfectly along the Italian front line. One Italian team peaks over his parapet…. falls dead, a lesson for the other teams. British left flank has the same…. rolling Matiidas, and the 3″ mortar teams dropping their shell rounds in the Italian trenches, no effect so far. Italians on their turn just hide and wait for their delayed reserves hopefully showing up.
Terrain notes: Open hard ground with low slope hills and rocky sandy patches. Italian trenches, barbwire and minefield sections. The Italian HMG and 47/32 nests have “small” trench section lengths pieces before them, hard to see in photos. WR needs to create some proper all-round “nest” positions for these teams.

Smoke bombardment on Italian trenches as the Indians advance supported by the Vickers and Matilidas. One dead Italian from Vicker .5″ firepower rakes trench parapet.
Turn Two: More British and Indian team advances… at the walking pace. Within range, the infantry teams open walking fire, adding to the tanks raking the Italian trench line. Another Italian team falls dead. The RA 25pdr. smoke bombardment lands again. Indian 3″ mortars land shells in the trenches causing another Italian team removal. Shaking off the massive British firepower, the Italian Fucilieri teams and HMG nests arise from their trench and open fire. Five Indian teams are hit and drop dead / wounded. One 47/32 A/T nest brews up a Vickers light tank. Score some success for the Italian fucilieri!

Allied firepower drops one Italian but the savage reply hits the Indian infantry hard. Five teams crumple KIA across front. One Vickers light tank brews up from a 47/32 impact on the thin armor.

Several KIA Indian teams from the Italian return firepower. Indian mortars have the range and kill one Italian team manning their trenches. HMG nest in lower trench end kill two teams.
Turn Three: Closing the range. The Indian infantry shake off the “pin” result with ease. Smoke bombardment continues to shield the exposed Indian teams. Firepower exchanged this time with little impact on the British right flank. Another Vickers light tank left burning on the open desert. On the British left, the Indian and Matilda MG drop two more Italian teams as the left flank Indian platoon hits the dirt. First chance for Italian delayed reserve arrival….. silence is heard.

Little to show for the firepower exchange except another burning Vickers light tank from A/T gun.

But on the Italian right flank two more teams bite the bullet and drop dead in their trench. Matilda and Indian 3″ mortars. The left Indian platoon has hit the deck to avoid the Italian firepower.
Turn Four: The Indian infantry surges to the barb wire and minefield edge. Vicker light tanks support their movement with directed 0.5″ firepower, hoping to pin the defending Italian fucilieri. Several wire crossing attempts…. most fail, so the planned assault stalls in open ground. Italian teams and nests open fire, dropping several Indian teams in their right hand platoon from HMG firepower. They break and flee tabletop from losses. Vicker tank teams take A/T fire, two bail out temporarily to repair their vehicle. The smoke saves many teams from hard losses. As for Italian delayed reserve arrival die rolls? None arrive.

Hard fighting. Indian platoons rush barb wire and minefield. Their crossing wire attempts mostly fail, ending any assault attempt this turn. Italian return fire… routs one Indian platoon completely.
Turn Five: The allied right flank assault continues with a dual assault by one Indian platoon with Vickers tanks support crossing the trench line after clearing the barb wire obstacle section. RA 25 pdr. troop adds more smoke to the sector saving several Indian teams from direct Italian firepower. Since the Vickers mkVIIb are rated like halftracks, they needed a skill test vs. the standard 1 out 6 bogging test. All passed, and their trench driveover crushed the sole defending Italian fucilieri team. Having breached the line, WR needs to plug the gap so he drops his ambush A/T platoon. The Italian 37/53 A/T guns open fire and brew up on Vickers tank straddling the trench. Finally the Italian reserves arrive. One M11/39 platoon drives on and rushes double speed forward since the smoke clouds somewhat block visibility of their movement.

Assault by the Vickers. Three Vickers tanks cross the trench and seek to destroy the defending Italian fucilieri team. The Indian platoon stands by to rush if the Italian defense crumbles.

Vickers clean out the trench. Nearby is the HMG nest pictured at left along the trenchline. Tanks cannot effect the nest, a job for the Indian platoon next turn.

Ambush! The Italian 37/53 AT patoon uncovers at 16.1″ and opens long range firepower on the exposed Vickers troop. One Vickers explodes into flames.

Finally Italian reserves drive on the table. A platoon of M11/39 tanks double times forward using the RA smoke bombardment as cover. Seems the Italian gearboxes held with no breakdowns.
Turn Six: With the breech of the Italian trench line, the Vickers back away to avoid the approaching M11/39 tanks. So the nearby Indian platoon must clear the HMG nest and remains of the Italian fucilieri defenders. As more RA smoke lands, the battle trained Indian platoon shifts slightly to enter the Italian trench then work their way along the trench to assault the HMG nest under the smoke clouds. Rushing the nest, one Indian team is cut down before the nest is destroyed. The noise draws more nearby Italian fucilieri teams to the former nest position, enlarging on-going close combat battles. They grenade another Indian team removal. The Indians counterattack and remove two Italian teams with close quarter bayonet work or rifle butts. Italian fucilieri platoon breaks and run away, leaving the 47/32 nest team to run away. Thanks to heaven…. the Indians occupy the trench line near the objective.
Note: Not sure if we resolved the trench fight correctly. Looking through the MRB we wondered about the 47/32 AT “nest team” would run away or remain solely as a independent team (bunker or nest) to continue the fighting. Since the nest is part of the actual platoon structure we applied the morale result universally to all the platoon teams, thus the nest team bolted with the rest of the platoon survivors.

Having entered the Italian trench line, the Indian platoon assaults the HMG nest from the Italian trench line. On Indian team cut down during final rush, the nest is destroyed.

Italian fucilieri platoon counterattacks the Indian platoon. Through smoke clouds, the confused fighting erupts along the trench line. Another Indian team removed.

Rallied, the Indian platoon surges forward into the Italian fucilieri and British smoke clouds. Close combat and grim bayonet work removes two Italian fucilieri teams, breaking the Italian morale.

Having cleared the last of Italian defenders, the battered Indian platoon reforms along the trench line and besides the objective while watching the approaching M11/39 carri platoon.
Italian reply mostly was firepower. The M11/39 carri platoon opens fire on the Indian platoon head down in the captured trench line. Joined by the arrival of the Demolisher platoon and nearby 37/53 A/T platoon firing directly into the trench shrouded smoke. The Indian platoon lose another rifle team, but pass their morale to grimly hold out.

M11/39, joined by arriving Demolisher platoon and nearby 37/53 A/T platoon, shell or fire upon the head down Indian platoon occupying the former Italian trench line.
Turn Seven: Redirecting fire…. the RA 25pdr. troop observer shifts targeting to bombard the newly arrived Demolisher platoon. The bombardment kills one team but also pins the Demolisher platoon in place. The Matildas “drive or waddle” towards the occupied trench line to open fire on the M11/39 carri platoon. Two Italian M11/39 are damaged and bailed out for the moment from 2 pdr. shells. This will soon prove to be the winning shot moment for British and Commonwealth side.

Matildas waddle forward to engage the M11/39. Two Italian tanks have damage and bailed crews from 2 pdr. Meanwhile the Indian platoon hides in trench as RA shifts to shell the Demolishers.
Italian turn starts with several bad morale tests. The Demolisher platoon fails to un pin so remains in place, instead of advancing to contest the Indian controlled objective. Near the objective the two M11/39 tank crews fail to re-occupy their tanks, still repairing the Matilda damage it seems. The big issue…. the carri platoon commander tank is one of the bailed crews. Therefore the active M11/39 platoon tanks cannot move and reach the objective, or come within 4″ of marker to contest. Scenario over with the battered Indian platoon scoring the win with the uncontested objective.

The M11/39 carri platoon somewhat limited in movement due to the lack of command caused by the bailed out commander’s tank. Cannot reach the objective to contest Indian control. Game over.
The scenario ends with the Indian platoon peeking over their trench parapet and seeing the pinned Demolisher platoon in the distance and several disabled M11/39 tanks struggling to repair damage. The overall report:
British / Commonwealth lost one Indian platoon with the remaining platoons near or over 50% losses. One Vickers troop bolted from tabletop with the others losing two light tanks. Matildas untouched. For the Italians: One Fucilieri platoon completely routed, another reduced to under 50% loss. M11/39 active but repairing two tanks at scenario end.

The final look on the tabletop. Clear British / Commonwealth victory with control of the upper objective near the stalled M11/39 carri platoon.
Interesting outcome and lots of game fun. Daniel worked his Indian platoons into position, smoking the Italians to rush the trench, and won the scenario. His Vickers light tanks supporting the assault every turn till the late arrival of M11/39 chased them away. WR watched the Matildas but his delayed reserve arrival somewhat hamstrung his counterattack to contest the Indian seized objective. Had several chances… but Italian morale dice failed on the critical turn.
Cheers from the at home warren. Next up a complete change to the Iberian peninsula and year 1808. The Battle of Evora 1808 featuring the French vs. Spanish / Portuguese defense outside Evora.
WR

Nice aar once againSent from my Verizon, Samsung Galaxy smartphone
Thx Tim,
Doing any gaming at your end? Finished up a Normandy FOW MRB 3.0 US Paras vs. Fallschirmjagers WWPD based scenario called “Cole’s Charge” today with Daniel (son). AAR soon after I finish the Battle of Evora 1808 AAR. Michael
Great game. It seems to me you were let down by your delayed reserves. Neither the 100/17 cannon or the L3/35 tankettes made an appearance. Especially the artillery might have made a crucial difference.
Them reserves….. love or weep sometimes. Must have hit the wine last night and left the radio off in the morning. M